Random Topics and Other Information

What is a Drone Congregation Area? Brood Frame Basics
Anatomy of a Trap-out How to become a beekeeper?

What is a Drone Congregation Area?
Despite the short drone lifetime, DCAs are in the same place each year
While some beekeepers may not be particularly fond of the drone bee – the male bees of the hive, the simple fact is, no drones – no bees. Although drones don’t directly contribute to gathering resources or performing work and duties around the hive, they do have one important focus in life – getting to a DCA, or drone congregation area, as often as they can.
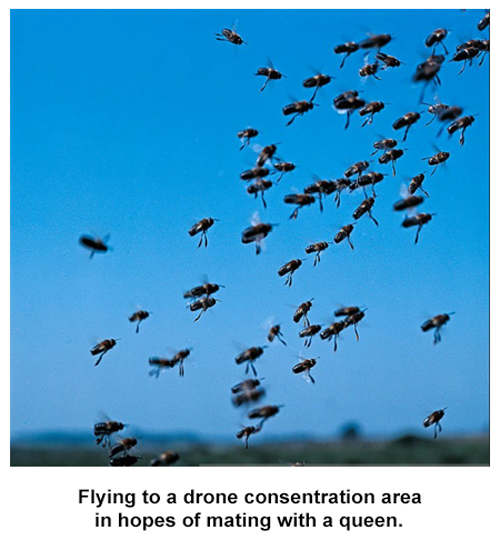 What exactly is a drone congregation area? Some elements remain something of a mystery, but a drone congregation area is an aerial, above-ground zone where drone bees from any hives within local range gather, waiting for the possible arrival of a virgin queen bee. If a queen arrives, these drones will mate with this queen, die, and the queen will then return to her hive. A queen may make several of these flights over several days of nice weather, but once these flights have concluded no further mating flights will take place over the life of that queen.
Queens typically fly as far as they can to find a DCA, and will avoid a drone congregation area close to their hive if possible, which helps with the genetic diversity of the species. On the other hand, drones like to pick a drone congregation area close to their hive. How drones and queens find a drone congregation area is not completely understood. However, these spots remain the same year after year, and it is believed that terrain, vegetation, and honey bee pheromones all play a role in bees establishing and locating these areas.
Once at a DCA, a drone will spend around half an hour or so loitering on-site. Drones may travel from DCA to DCA and will then return to their own hive or any hive they might find along the way for the night and to feed on honey. A drone congregation area may be made up of drones from dozens of hives in the area.
Contributing to the intrigue of beekeeping, some elements of the drone congregation area may always remain something of a mystery. In any event, bees manage to find these areas with relative ease and when (not if!) a beekeeper finds themselves with a new queen in the hive, you’ll be counting on those drones and your local drone congregation areas for the future success of your hive.
Return to the Top
Brood Frame Basics
by Mandy Shaw of Bee BuiltMastering the skill of reading a brood frame takes time. But with practice and some helpful guidance, your understanding of the brood nest will eventually become second nature.
 Brood frames are generally located through the center of the hive's built out frames. If you aren’t using a queen excluder and have several boxes worth of actively occupied frames you may see that the bees build a more narrow and vertical brood area extending the height of the hive. That being said, sometimes the queen will settle in one box and just stay there. All colonies
are unique and observing how yours likes to arrange their brood area is a wonderful way to better understand your bees
Brood frames are generally located through the center of the hive's built out frames. If you aren’t using a queen excluder and have several boxes worth of actively occupied frames you may see that the bees build a more narrow and vertical brood area extending the height of the hive. That being said, sometimes the queen will settle in one box and just stay there. All colonies
are unique and observing how yours likes to arrange their brood area is a wonderful way to better understand your bees 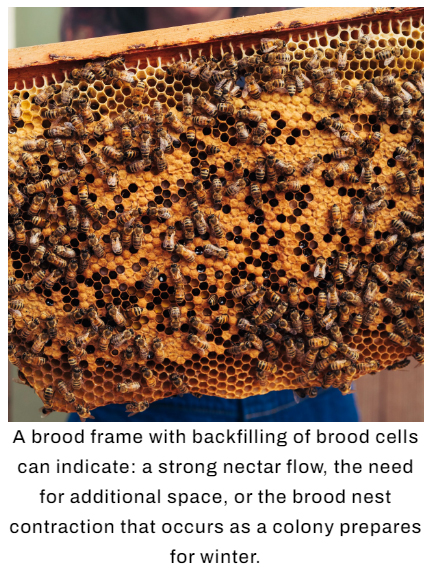 and the seasonal influences of your location.
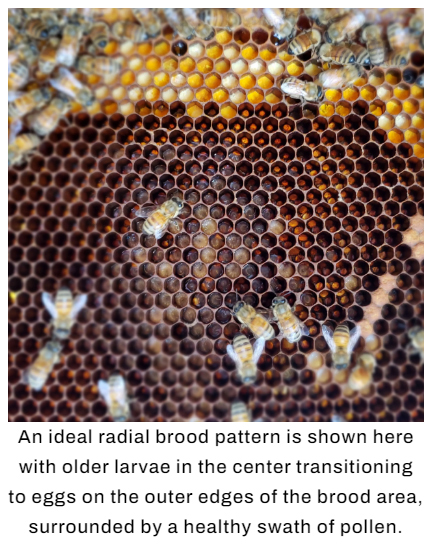
No matter what type of hive or frames you and your bees are working with, the makeup of a healthy brood nest should consist of these elements: eggs, larva, capped brood, pollen, nectar, capped honey, a queen bee and nurse bees. Depending on the time of year, in addition to seeing worker brood, you will see drone brood and queen cells or queen cups in the brood nest as well.
When the queen lays her eggs she should be laying in a radial pattern that starts near the center of the frame and working her way outwards. When the frame is nearly full of eggs, she will move onto another frame to continue her work.
 As the season progresses there will be some deviation from this starting point. Food storage, colony health, and queen health can have an impact on the brood pattern.
The nurse bees care for the eggs and larvae, making sure they are warm and well fed throughout these developmental stages. Once the larvae is ready for pupation the nurse bees will add a wax capping to protect the larva as it begins its
final transformation into a fully formed bee. In terms of brood,
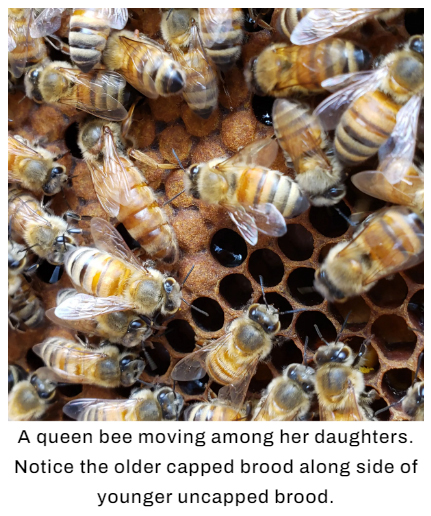 you may see a mix of frames with only eggs and larvae, or frames of mostly capped brood. These frames should all have a nice congregation of nurse bees on them.
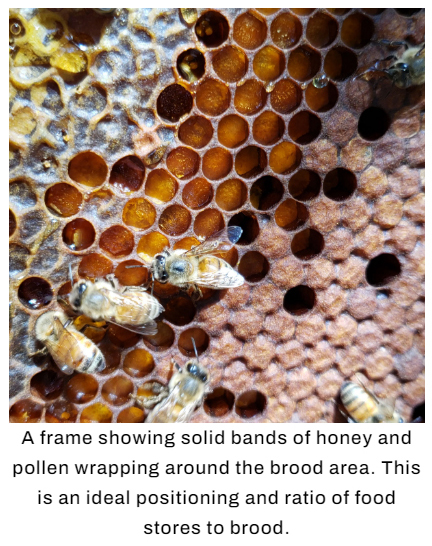
The brood frame needs to have food stores close at hand for the nurse bees to feed the larvae. Pollen is often found in a band or ring surrounding the brood area, followed by nectar or capped honey. Larvae are fed royal jelly, bee bread, and nectar/honey. When a nurse bee consumes bee bread (pollen fermented with nectar and water), it stimulates the glands that produce royal jelly. Having well fed nurse bees means having well fed larvae!
Disruptions in forage availability, quality, and even forager population can have an impact on the brood area. You will notice that throughout the year there are fluctuations in the amount of brood. Other times, you may see that your brood frames are being backfilled (meaning when a bee hatches out of its cell, the cell then gets filled with nectar or pollen). These are important clues to help guide your next steps as colony manager.
Return to the Top
Anatomy of a Trap-out
by Gordon ReillyNew hobbyist beekeepers often ask how they can increase their colonies without purchasing additional packages or nucs. It's all a matter of money and time. Catching swarms either directly, or in a bait hive is one quick method, however, it is subject to the availability of swarming bees. Splitting stronger colonies into one, two, or even three hive boxes can be effective, but many beekeepers do not want to give up the year's honey production from their strong hives just to build their number of colonies. Cut-outs can be used to increase numbers, however, those procedures are best left to the more experienced beekeepers, and to the professional live bee removal experts.
 Another great way for beginners to increase their apiary numbers is to engage in trapping bees out of trees and structures. The procedures are not too difficult to learn and can be accomplished by rank beginners with just a little study and a little forward thinking. The first order of business is the assessment. In the trap-out exampled here the bees had set up between the first and second story floor beams and were entering the cavity through a 1 inch corner gap in the fascia board. The brick presents a minor problem in that one must remember, this is someone's home, their personal property, and the goal should always be to cause an absolute minimum of damage. Here is where the pre-planning comes into play, selecting the correct materials to accomplish the trap-out with the ease of setup and minimize the structural damage.
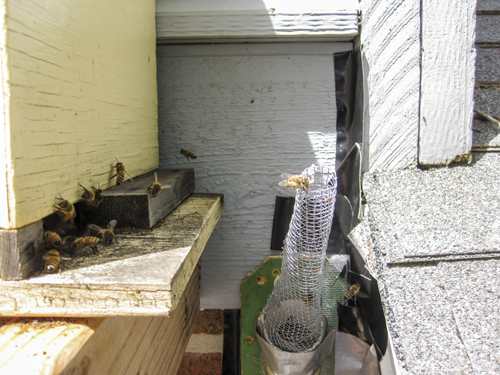
In this example I start with a short section of 2 inch PVC tubing hot glued to pieces of pre-cut scrap plywood serving as a base. Each base has a hole to roughly match size of the PVC tubing. Some of my base units oriented at 90 degrees, some are up to 6 inches or more square, and some are angled at 45 degrees as in this example. This makes the base units reusable and adaptable to many different trap-out situations. The tapered escape screen cone is not installed until I have the base mounted, and the gaps plugged and sealed. This is a personal practice, in that it allows the returning bees to find an easy way back into their colony while I'm sealing everything up, thereby keeping the number of confused and stressed bees flying and crawling around to a minimum while I work. No. 8 hardware cloth is used for the tapered screen. Mine are stitched with fine wire and then hot glued to maintain the desired shape. Hardware cloth is not the easiest to work with, and ordinary aluminum insect screen can be used as a substitute. Avoid using plastic screen in that it is difficult to keep the long tapered cone in shape without collapsing and folding over thereby blocking the escaping bees. Always have the tapered screen pointed up as much as possible. The last thing you want for your trap-out is to have dead bees or debris plug up the small end of the wire escape cone. Don't use a lot of sealing tape near the open end of your cone; if the bees can distinguish the small escape opening from the rest of the cone, they will learn to use it to return to the original colony. The size of the small opening at the end is not extremely important. It should be large enough for two or three bees to leave at the same time. Too large and the bees can just fly right into the open end.
What is important is that the cone be open and airy, and long enough to make it almost invisible to the bees, and difficult for them to find the cone opening.
In this example a bee escape set at a 45 degree upward angle was selected. An “L” shape ¾ by ¾ inch wood strip was screwed under the plywood to help fill the gap between the brick and the escape. This allowed pieces of plastic shopping bag to be stuffed between the brick and the base of the escape. Silicone calking can be used, however, clean up on something like brick can be difficult if not near impossible. Remember; minimal property damage is a goal. Aluminum screen was stapled to the right hand side and stapled to the adjoining fascia to close the irregular gap. Gorilla tape was used to complete the final seal between the brick and the fascia board. You can use the cheap stuff, but Gorilla tape sticks to the brick and the bees can't chew through it. I like to seal out as much light as possible to discourage the returning bees from trying to get back into their hive, or feeding the trapped bees through the screen. The returning bees can't get through the screen, but what they can't see or smell causes less stress, and I've found they will more quickly adopt to the new hive box. After the entire set-up is complete, the last task is to slide the tapered cone over the PVC and tape it in place.
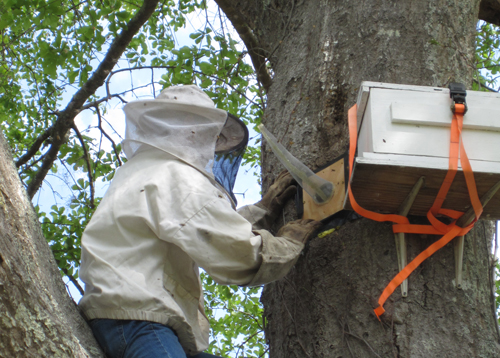
Next in the process is the placement and support of the trap box. I've constructed a 2X4 frame on which to support the trap box and keep it level. This frame has bee screwed to trees, supported on stilts, secured to the side of buildings, and set on the ground with brick shims to make it level. It could just as easily been constructed out of 1X4's, but a 2X4 is
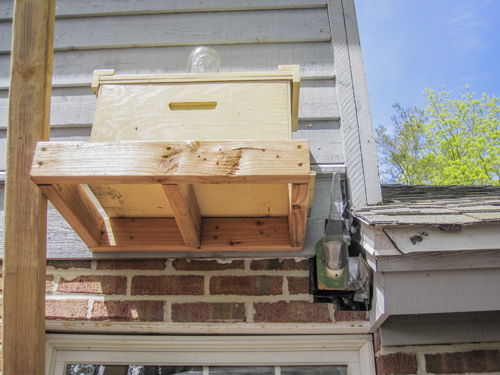 what I had available and it has worked well for a half dozen or more trap-outs. The stable platform is much better than trying to strap a rectangular box to the side of a tree, and no other equipment like a ladder can be tied up for the 4 to 6 weeks it takes to completely remove the bees from the tree or structure. In this example, the 2X4 frame, which will accommodate either a 5 frame box or an 8 frame box, is screwed to the fascia board. A single support brace going from a bottom window sill is screwed to the back of the frame.
The trap box is prepared ahead of time with one frame of brood. Make sure your frame contains plenty of fresh eggs, in that it may be two or three days before the bees decide to raise their own queen and the open larvae may have aged too long to make good queens. Eggs will have developed into larvae of the perfect age for developing queens. In this example I found a frame with three ripe queen cells and both sides filled with mostly capped brood, eggs and larvae in various stages of development. It is always a good practice to include a feed jar to give additional incentive for the escaping honeybees to set up house keeping and start building comb. For this trap-out pieces of plastic shopping bag was stuffed under the fascia board to completely seal off any openings for returning bees to get back into their former home.
It is wise to check the trap-out for the first few days to see if the bees have found an alternate way back in, and they are persistent. More than once I spotted one of these alternate entrances as much as 6 or 8 feet from the original opening. You want to check the trap-out about once per week thereafter looking for a large exodius of bees, plugged escape, alternate entrances, and to evaluate the number of returning bees from the trapped colony. Spending a little time with the property owner, who are usually quite interested in the process can be a big help in this regard, especially on the more distant trap-outs. The escape end of the tapered screen and the new hive entrance could not have been more ideally located. You want the returning bees to be able to walk over to your trap box, and not needing to fly over to their new home. In this case the returning bees could literally walk over to the 2X4 frame, up and into their new home. Again, it is good practice to get the escape cone pointed at an upward angle, so that it will not become plugged with debris or dead bees.
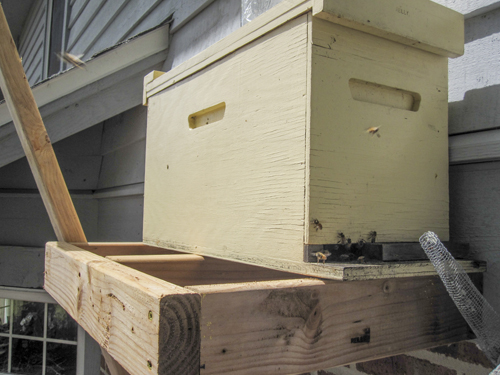
 I use a five frame trap box because it is lighter and easier to put up and take down. If you are trapping out a monster colony that has been in place for a year or more, you can remove a full trap box and replace it with a fresh setup and another frame of eggs and brood. A monster trap-out can yield two or three new colonies just by changing out the trap-box.
As a practice I always advise the home owner, or property owner, the complete process will take 4 to 6 weeks for the fresh eggs, larvae, and emerging brood to age out and come out the escape and for the trapped queen to stop laying. On one trap-out I actually had the queen come out and take up residence in the trap hive after about a week. There was of course was the possibility she may have been a virgin queen coming out for a mating flight and moved right into the trap hive. After about 5 or 6 weeks, there are three options for a home owner. 1) Consider the internal stores pretty well used up and all but a few bees left, and plug off the opening. 2) Pull the escape off and allow the new colony to go back in an rob out any remaining honey, then plug the opening. 3) Suggest the home owner hire a contractor to remove the fascia and any blocking structure so the remaining comb can be removed and the area scrapped clean. Option three is best left to a professional contractor.
In conclusion, with a little skill and pre-planning a beginner beekeeper can complete a successful trap-out. Each circumstance will be different, but the steps will remain pretty much the same. Patience and a source of at least one frame of eggs, larvae, and/or emerging brood are pretty much necessities. It would be possible to start with fresh foundation, and after the first couple of days to introduce a new queen, but keep in mind the bees will be pretty stressed, and the introduction may not be successful. Remember to be especially careful working off ladders or working in high awkward places. A trip to the emergency room will be a lot more expensive than buying packaged bees. Again, the more difficult removals should be left to the experienced and the professionals. This particular trap-out was about 6 feet up from a full backyard deck and easily worked from a 6 foot step ladder. Remember as well that even a 5 frame box of bees, brood, honey and stores after 3 or 4 weeks, is going to be a lot heaver than when it was set-up. Good luck to warm sunny honeybee days, and may the flow be with you.
Return to the Top
How to become a beekeeper?
A step-by-step guide to get started by Bees4LifeLately, a lot of folks out there are wondering how to become a beekeeper. In fact, beekeeping has boomed
 in popularity over the last few years. That’s what many beekeepers associations around the world confirm.
Let us give you some examples:
In the last 18 years, the number of beekeepers in Germany increased from around 110,000 to 150,000. That’s a plus of 36% Similar to the trend of urban gardening there is also a trend to backyard beekeeping.
Another example comes from the UK: the British beekeeper’s association’s membership numbers registered a rise from about 8,500 people in 2008 to more than 24,000 in 2017. Many of those people live and keep bees in towns and cities
Do you wonder how to become a beekeeper Great! You are part of a growing community!
Another interesting fact is that each beekeeper in Germany keeps an average of only 6.7 bee colonies. And less than one percent are engaged in commercial beekeeping.
Here is an overview of the relation between the number of colonies (size of the beekeepers) and the number of beekeepers.
0-25 colonies: 96% of beekeepers
26-50 colonies: 3 % of beekeepers
over 50 colonies: 1 % of beekeepers
This is quite similar to what we’ve found out about the number and sizes of farmers.
The Food and Agriculture Organization FAO confirms, the majority (more than 90%) of all farms in this world seem to be small-scale farms, holding about 53% of all agricultural land. For more information read our article Large-scale farms: Can we feed the world with permaculture?
Okay, so far so good. We now know two important facts that are interesting for you if you are thinking about starting with beekeeping:
- The number of beekeepers is increasing so there is something positive related to beekeeping. Otherwise, the number of people wouldn’t increase. Good to know for you! AND
- There is a community of beekeeping beginners which whom you can connect and improve and grow together.
- Most of the beekeepers only keep a few hives. The reasons may vary but it seems to be proven practice.
This leads us to the first thing that you should consider when you are thinking about starting with beekeeping.
1) Define the reason and motivation why you want to keep bees
What is your reason? What’s your motivation?
These are the first and most important questions right after you google “how to become a beekeeper”. So let’s go through this process together.
Why do you want to start with beekeeping?
- Did you hear about the fact that bees are endangered and you would like help?
- Do you need bees as pollinators for your veggie garden because you want to make sure that you get a good harvest?
- Would you like to have delicious honey from your own bees?
- Do you also like to harvest other products like wax or pollen?
- Is it your goal to earn money with beekeeping?
- Do you have a bit of free time and look for a hobby that involves some physical work outside?
- Are you ready to take responsibility for a beehive with about 45,000 animals?
- No one in your family is allergic to bees?
- Last but not least, you are willing to spend time gaining knowledge about bees and beekeeping before you get started?
If you can at least answer 4 of the above questions with yes, you should definitely keep on reading!
The more questions you could answer with yes, the more likely it is that beekeeping is suitable for you.
In the following, we will answer these questions step by step. We also explain what you should consider in order to get started without threatening the living creatures for which you want to care.
This leads us to the second step:
2) Gain knowledge about bees and beekeeping
Knowledge is key!
- Read our articles about sustainable beekeeping and bee products. If you are asking yourself how to become a beekeeper, it’s good to know the basics.
- Speak to a beekeeper in your area and ask him all the questions you may have. Also, ask him how much time he/she has to spend on bees. The time efforts vary in each area depending on the climate and the necessary pest control activities (mainly varroa).
- Buy or lend some books or search the internet for information about beekeeping.
- Search for beekeepers’ clubs or other initiatives that offer beekeeping courses in your area and attend a course.
3) Define a place for your hives
Each country has different regulations. Make sure you find out the regulations and restrictions for your area before you get a hive.
This is an example of how they can look like:
In Australia, the hives can be kept within 3 meters of a boundary fence if:
- the height of the solid fence is more than 2 meters.
- On the adjoining property to the fence, a building of not less than 2 meters high is constructed on the fenceline immediately adjacent to the hives which have no window or other openings in the elevation on the fenceline
- The adjoining property to that fence is unimproved land
- An impenetrable vegetation barrier (such as a hedge) not less than 2 meters high is located on the property boundary adjacent to the hives. If the above conditions cannot be met, the minimum distance hives can be kept from a fence is 3 meters.
You see, there are clear restrictions in some countries and you should better get aware of them before you get started. ??
Your local beekeepers’ club is a good place to get this information.
Where to put a beehive in your backyard?
- Don’t put the hive in complete shade – 50 percent sun and 50 percent shade during the day is ideal.
- Face them towards the sun. In the southern hemisphere, the entrance of the hive should face north, in the northern hemisphere south.
- Don’t only rely on the food sources that your neighbors and nearby farmers may provide. Plant some bee-friendly flowers in your garden. Here you can find a list of suitable plants.
- Remember that bees fly up to 5 km. As intensive farming is a huge problem in many countries, make sure that a) your bees find enough food all year round and b) try to find out if nearby farmers use chemicals that are harmful to bees.
- If you live in a rental place, speak to your landlord.
- Also, speak to your neighbors and find out if they are allergic to bees and inform them that you are planning to keep bees. Experience shows that a little honey as a small souvenir of friendship is an excellent way of convincing skeptical neighbors. ??
4) Decide which way of beekeeping you want to practice. Conventional or organic
In conventional beekeeping, the focus is on honey yield.
In natural beekeeping, the approach is more oriented towards the needs of the bees, honey yield is secondary. This is the approach that we at Bees4life support. However, completely natural and organic beekeeping might be difficult for you to achieve. As we already mentioned, bees have a flight radius of 5 km and in most cases, you can’t influence the farming method of the farmers around you. You could definitely speak to them and ask if and if yes, what they spray. Some farmers inform the local beekeepers before they spray their orchards so that beekeepers can move their hives to a different place during that period. What you definitely can influence is to treat your bees very well. That’s what’s called sustainable beekeeping. For more information please read our articles about sustainable beekeeping.
5) Choose the type of hive for your bees.
You can choose from hundreds of different types of hives. Most people who are wondering how to become a beekeeper are also clueless when it comes to hives.
In this article, we list the most common hive types with their pros and cons.
We introduce:
- Longstroth / Dadant hives
- Top bar hive
- Warré hive
- Golden Hive or One-Room Hive (Einraumbeute)
- Flow Hive
The type of hive mainly depends on:
- the way of beekeeping you want to practice,
- the number of hives you are planning to keep and
- whether you want to make a living off beekeeping or not.
6) Get your tools and beekeeping equipment
The beekeeper's basic equipment consists of a stick chisel, veil, gloves, broom, and smoker.
If you live in an area where you have to treat your bees against the varroa mite you will also need to get formic acid & oxalic acid. Accessories and materials can be found in your local beekeeping supply store and at various online retailers.
7) Last but most important, get your bees
The question about the type of beekeeping, the type of housing, and the bee race you choose are closely related to each other.
- Basically, we support local procurement of honey bees, which at best come to your home like a swarm. In this case, you can be sure that your bees are vital, locally adapted, and have no diseases.
- Speak to experienced beekeepers in your area in order to find a bee race that is well adapted to your area and climate.
- Get your bees from a trusted source like a beekeeper's club.
- For more information about the many different races read our article about bee races.
Here is our final tip and big request…
Enjoy your exciting journey, but please make a serious commitment and gain substantial knowledge before you get your first hive.
There is a trend around the world, that people who don't know much about beekeeping buy a hive on the internet, put it in their backyards, and feel like they have done something good for the environment and the bees. NOT AT ALL!
We don't have exact numbers but many hives die already within the first year or even spread diseases to other hives.
We all want to help stop the extinction of bees but putting a hive into your backyard without any knowledge and without taking care of it is contra-productive.
We hope that this guide helped you to understand how to become a beekeeper and more importantly, how to make a good decision for you and the bees.
Be(e) curious but mindful and enjoy caring for these beautiful creatures!
Return to the Top